
Considering noip.com, we configure our device to use a domain name instead of a dynamic IP. With this, we can connect to the remote device without knowing its IP.
Considering noip.com, we configure our device to use a domain name instead of a dynamic IP. With this, we can connect to the remote device without knowing its IP.
To connect via SSH to a remote device, in the terminal we type:
ssh ortiz@87.123.243.210 -p 1132
In your case, of course, you must specify your username, IP, and external port. This was explained in the article: "How to connect through SSH to a remote device that is not in the same network." The nuisance with this command is that it requires that you type the password of the remote user every time you connect. To avoid this and thus have direct access, we can consider the public key authentication. By doing so, we type:
ssh -i ~/.ssh/nepy.key ortiz@87.123.243.210 -p 1132
In contrast to the previous case, here we need to add the path to nepy.key. This was explained in the article: "How to connect through SSH without passwords: The public key authentication." In both cases, however, as you can see, we need to type the IP of the remote device, which can be dynamic and therefore can change over time. If it does, we would constantly need to check what the current IP number is. To avoid this, it is advisable to consider a DNS (Domain Name System), which is fixed even if we have a dynamic IP. Moreover, because it is a name, it is much easier to remember than the IP.
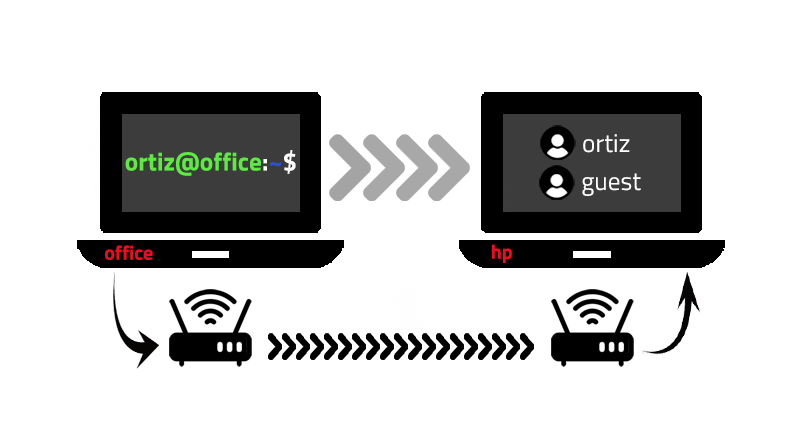
There are several companies that offer this service. In this article, we consider noip.com, which allows you to set up a DNS for free. To exemplify its use, we are going to consider two devices that belong to different networks. In Fig. 1 we represent this system, where the devices are called office and hp. Our goal is to connect from the office device to the hp device using DNS.
A summary of this article with some extra info appears in the following video:
The steps to follow are:
1. Create the DNS
Create an account at noip.com. Then, go to Dynamic DNS ➔ No-IP hostname and click on Create hostname, see Fig. 2.

A window opens. There, we choose a name and a domain, and add the IP number that we want to link to the DNS, see Fig. 3.
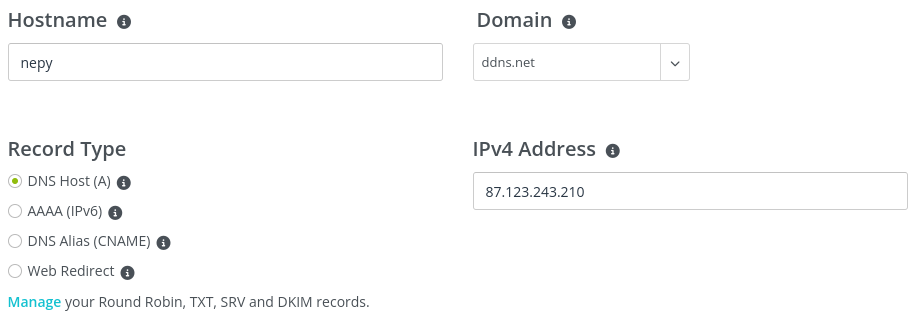
With this information, we create the DNS. In our case, it is nepy.ddns.net, and it is linked to the IP 87.123.243.210, which corresponds to the hp device.
2. Install DUC
Having created the DNS, we now proceed to install DUC (Dynamic Update Client), which checks if the IP has changed over time. If so, DUC will update the DNS and link it to the new IP. DUC must be installed, in our case, on the hp device. Therefore, in its terminal, we type:
sudo su
With this, we are now the user root and we can proceed to download the required files in the /usr/local/src directory:
cd /usr/local/src && wget https://www.noip.com/client/linux/noip-duc-linux.tar.gz
In case the link doesn't work, you can get more information at https://my.noip.com /dynamic-dns/duc. Once the tar file is downloaded, we extract it:
tar xzf noip-duc-linux.tar.gz && rm noip-duc-linux.tar.gz
By doing so, we get, in our case, the noip-2.1.9-1 directory. We access to it and type make:
cd noip-2.1.9-1 && make
Then, we proceed with the installation:
make install
In the process we will be requested to type our email and the password that we chose when creating an account at noip.com. We will also be requested to type how often we want DUC to check if the IP has changed and if we want to run a message every time the IP is updated:
Please enter the login/email string for no-ip.com usuario@nepy.pe
Please enter the password for user 'usuario@nepy.pe' **********
Only one host [nepy.ddns.net] is registered to this account.
It will be used.
Please enter an update interval:[30] 5
Do you wish to run something at a successful update?[N] (y/N) N
In our case, we don't want to run a command in a successful update and we choose to check the IP every 5 minutes. With this, DUC is configured. To activate it, we type the following:
/usr/local/bin/noip2
3. Access to the remote device
With DUC enabled, to remotely access to ortiz@hp, we type the following on the office device:
ssh -i ~/.ssh/nepy.key ortiz@nepy.ddns.net -p 1132
In this case, we have replaced the IP with the DNS. The biggest advantage is that now we no longer have to worry about knowing the current IP. If you want to further simplify the access, there are two methods that you can consider, to understand them, I invite you to read the articles: i) "How to connect through SSH without typing the access parameters: The bash alias" and ii) "How to connect through SSH without typing the access parameters: The config file."
Views: 1
Related Articles


Notifications
Receive the new articles in your email
Other Articles

12 interesting facts about living in Russia
joushe info


Living in Japan. Breakfast, lunch, and dinner
stats con chris

How to make profits with bad investments
stats con chris

Why do altcoins follow bitcoin trend against the dollar
stats con chris