
Codes to improve the functionality of your website
We have a list of 7 modifications::
Below we detail each of them:
1. Customize the comments section
By default, WordPress templates use a standard comment form that is called using the following function:
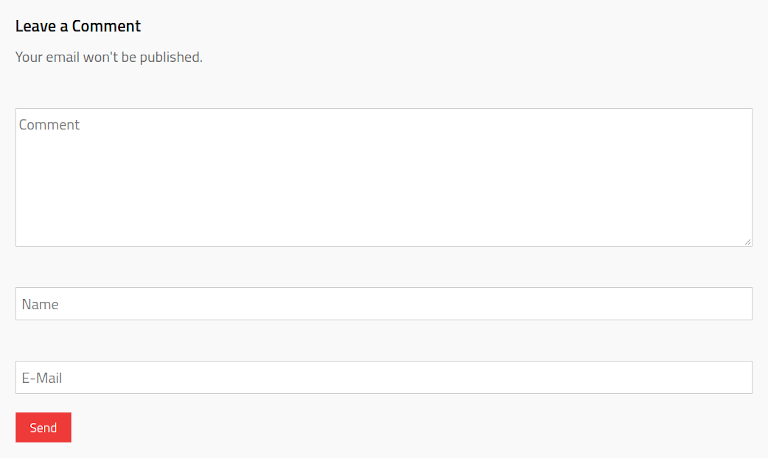
comment_form();This function is written in the file comments.php, located in the path: appearance ⇒ theme editor. To customize the form and get one similar to Fig. 1, simply replace the top line with the following code:
//Variables$comment_send = 'Send';$comment_reply = '<h3>Leave a comment</h3>';$comment_reply_to = '<h3>Reply</h3>';$comment_author = 'Name';$comment_email = 'E-mail';$comment_body = 'Comment';$comment_url = 'Website';$comment_cookies_1 = '';$comment_cookies_2 = '';$comment_before = "<p>Your email won't be published.</p>";$comment_cancel = '<span style="font-size:16px">Cancel Answer</span>';//Arrays$comments_args = array(//Fields'fields' => array(//Author'author' => '<p class="comment-form-author"><br /><input type="text" id="author" name="author" aria-required="true" placeholder="' . $comment_author .'"></input></p>','email' => '<p><br /><input type="email" id="email" name="email" placeholder="' . $comment_email .'"></input></p>',//URL'url' => '<p></p>',//Cookies'cookies' => '<p></p>',),//Send Button Label'label_submit' => __( $comment_send ),//Reply Title'title_reply' => __( $comment_reply ),//Reply To Title'title_reply_to' => __( $comment_reply_to ),//Cancel Reply Text'cancel_reply_link' => __( $comment_cancel ),//Textarea'comment_field' => '<p class="comment-form-comment"><br /><textarea id="comment" name="comment" aria-required="true" placeholder="' . $comment_body .'"></textarea></p>',//Message Before Comment'comment_notes_before' => __( $comment_before),//Remove "Text or HTML to be displayed after the set of comment fields"'comment_notes_after' => '',//Submit Button ID'id_submit' => __( 'comment-submit' ),);//Commentcomment_form( $comments_args );
2. Add tweets and Twitter buttons
Twitter codes are registered in publish.twitter.com. In the case of nepy.pe, the associated Twitter account is @statsconchris, therefore, the codes are as follows:
<a class="twitter-timeline" data-lang="es" data-height="550" data-theme="light" href="https://twitter.com/statsconchris?ref_src=twsrc%5Etfw">Tweets by statsconchris</a><script async src="https://platform.twitter.com/widgets.js" charset="utf-8"></script>
<p style="text-align: center;"><a class="twitter-follow-button" href="https://twitter.com/statsconchris?ref_src=twsrc%5Etfw" data-size="large" data-lang="es" data-show-count="false">Follow @statsconchris</a><script async src="https://platform.twitter.com/widgets.js" charset="utf-8"></script></p>
The first code allows you to add a timeline of the tweets. The second one allows you to add the follow button.
3. Add Jquery on posts, e.g., Accordion
Title 1
Text of the first accordion.
Title 2
Text of the second accordion.
The codes given here allow you to add any Jquery function to your post. As an example, consider the accordion given above. For this, we add the following code in functions.php (located in your WordPress template):
function wpb_hook_accordion() {if (is_single ('100') || is_single('200') || is_single('300') ) {wp_enqueue_script('jquery-ui-accordion');wp_register_style('jquery-custom-style', get_stylesheet_directory_uri().'/assets/css/jquery-ui.min.css', array(), '1', 'screen');wp_enqueue_style('jquery-custom-style');wp_enqueue_script('custom-accordion',get_stylesheet_directory_uri() . '/assets/js/accordion.js',array('jquery'));}}add_action('wp_enqueue_scripts', 'wpb_hook_accordion');
In your case you must change the numbers given in is_single() with those ids that identify your posts that have an accordion (refer to the second line of the code). As you may notice, two files are required to have a functional accordion. The first one, accordion.js, is the one that you create. There you write the following:
jQuery(document).ready(function($) {$( "#accordion" ).accordion({ header: "h3", collapsible: true, heightStyle: "content" , active: false });$( "#accordion2" ).accordion({ header: "h3", collapsible: true, heightStyle: "content" , active: false });$( "#accordion3" ).accordion({ header: "h3", collapsible: true, heightStyle: "content" , active: false });$( "#accordion4" ).accordion({ header: "h3", collapsible: true, heightStyle: "content" , active: false });});
In nepy.pe (first version), this file is saved in: appearance ⇒ theme editor ⇒ assets ⇒ js ⇒ accordion.js. As you can see from the code above, 4 accordions are set with their respective ids. If you just want to have a single accordion, just consider one id, e.g., id=#accordion. The second file, jquery-ui.min.css,, is a standard file that you can download from Jquery's website, or you can also copy it from the following link: jquery-ui.css. However, keep in mind that in this link, the file is not minimized, so you must previously minimize it and save it as: jquery-ui.min.css. To minimize the file you can use CSSminimizer. In the case of nepy.pe (first version), this file is saved in: appearance ⇒ theme editor ⇒ assets ⇒ css ⇒ jquery-ui.min.css. In case you want to stylize your accordion, for example by changing the color, you must modify this file. The most practical way to do this is by considering ThemeRoller, which is a web-interface that allows you to style the accordion just by clicking on buttons. Once you are satisfied with the new style, you proceed to download the associated CSS file. For additional modifications, you could add a few lines to your stylesheet file considering the id of your accordion. In nepy.pe the stylesheet file is called style.css. There we write the following:
#accordion {padding-bottom:10px;}
The above code just adds an extra padding to the accordion. Finally, to create the accordion, on your post you must write the following:
<div id="accordion">
  <h3>Title 1</h3>
  <div>
    <p style="text-align: justify;"><span style="font-size: 14pt;">Text of the first accordion.</span></p>
  </div>
  <h3>Title 2</h3>
  <div>
    <p style="text-align: justify;"><span style="font-size: 14pt;">Text of the second accordion.</span></p>
  </div>
</div>
4. Allow the use of JavaScript & PHP on posts
The use of PHP in a post is given in the article: "PHP algorithm to simulate the FIFA World Cup draw." The use of JavaScript in a post is given in the article: "Investing in cryptocurrencies. The math behind the trading fees." To know how to implement them in your WordPress site, refer to the Github repositories of the aforementioned articles.
5. Suppress the loading of unnecessary files, e.g., Dashicon & LightSlider
It is common for a website to take time loading its page because to be fully functional it requires a lot of files. To find out what these files are we use Google Chrome: i) Right click on the page in question. ii) We choose inspect and then coverage. Doing this, Google Chrome shows us the list of files that are active when loading the page. It also tells how much memory these files consume and how important they are. One of the files that is always active is Dashicon, however it is not important because it generates icons only in the WordPress administration window. That is why it is better to remove it to speed up the loading process. To achieve this, we need to write the following code in functions.php:
//Remove Dashicon for usersfunction wpdocs_dequeue_dashicon() {if (current_user_can( 'update_core' )) {return;}wp_deregister_style('dashicons');}add_action( 'wp_enqueue_scripts', 'wpdocs_dequeue_dashicon' );
Another unnecessary file is the one that is only used on the main page, but keeps loading on different pages. As an example I will consider the file lightslider-style. To remove it from all pages except the main one, we write the following in functions.php:
//Remove lightslider-styleadd_action( 'wp_enqueue_scripts', 'my_deregister_javascript', PHP_INT_MAX );function my_deregister_javascript() {if ( !is_front_page() ) {wp_dequeue_style( 'lightslider-style' );}}
6. Fix an image slider, e.g., LightSlider
By default, WordPress templates that come with a carousel on their front page do not have the option to remove the scroll, that is, one could choose a single image and still the scroll would continue to exist, repeating the same image multiple times (see Fig. 2). To avoid this we have to modify the code of the carousel. In the case of nepy.pe (first version), we use Jquery LightSlider and the code given in the main page is as follows:
<?php$slider_args = editorial_pro_query_args( $nepy_slider_category_id, $nepy_slide_count );$slider_query = new WP_Query( $slider_args );if( $slider_query->have_posts() ) {echo '<ul class="editorialSlider cS-hidden">';while( $slider_query->have_posts() ) {$slider_query->the_post();?><li class="ep-post-wrapper"><a href="<?php the_permalink();?>" title="<?php the_title(); ?>"><figure><?phpif( has_post_thumbnail() ) {the_post_thumbnail( $slide_image_size );} else {$image_src = nepy_image_fallback( $slide_image_size );echo '<img src="'. $image_src[0] .'"/>';}?></figure></a><div class="slider-content-wrapper"><?php do_action( 'nepy_post_categories' ); ?><h2 class="slide-title large-size"><a href="<?php the_permalink();?>"><?php the_title(); ?></a></h2><div class="post-meta-wrapper"><?php nepy_posted_on(); ?><?php nepy_post_comment(); ?></div></div><!-- .post-meta-wrapper --></li><?php}echo '</ul>';}wp_reset_postdata();?>
As you can see, the carousel is set using the <ul> and <li> tags. Therefore, to remove it, simply replace these tags with <div>, i.e., we replace the code given above with the following:
<?php$slider_args = editorial_pro_query_args( $nepy_slider_category_id, $nepy_slide_count );$slider_query = new WP_Query( $slider_args );if( $slider_query->have_posts() ) {echo '<div>';while( $slider_query->have_posts() ) {$slider_query->the_post();?><div class="ep-post-wrapper"><a href="<?php the_permalink();?>" title="<?php the_title(); ?>"><figure><?phpif( has_post_thumbnail() ) {the_post_thumbnail( $slide_image_size );} else {$image_src = nepy_image_fallback( $slide_image_size );echo '<img src="'. $image_src[0] .'"/>';}?></figure></a><div class="slider-content-wrapper"><?php do_action( 'nepy_post_categories' ); ?><h2 class="slide-title large-size"><a href="<?php the_permalink();?>"><?php the_title(); ?></a></h2><div class="post-meta-wrapper"><?php nepy_posted_on(); ?><?php nepy_post_comment(); ?></div></div><!-- .post-meta-wrapper --></div><?php}echo '</div>';}wp_reset_postdata();?>
7. Remove WooCommerce
Many WordPress templates, by default, incorporate functionalities related to WooCommerce, which is a plugin that allows you to set an ecommerce website. In case your website doesn't need ecommerce functionalities, then it is recommended to remove WooCommerce from your site in order to improve its loading speed. For example, in style.css, we can remove all classes and ids that are part of WooCommerce. To solve this successfully, it is recommended to use the Google Chrome tool that allows you to identify unnecessary files. This was explained in point 5).
Once the above modifications are done, I can guarantee you that you will end up with a website that will have a better loading speed. If you want to check the codes related to styling your website, click on the following button:
Views: 1
Related Articles


Notifications
Receive the new articles in your email
Other Articles

How to exchange currencies during a global crisis
stats con chris

12 interesting facts about living in the Andes
stats con chris

How to make explosive gains in the stock market
stats con chris

Forecasts from March 2019 to January 2021
stats con chris

Unburnable carbon
joushe info