
Codes to style your website
We have a list of 8 modifications:
Below we detail each of them:
1. Stylized pagination
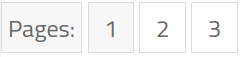
When we use the page break option in the text editor of a post, new pages are created and a pagination button appears. Unfortunately, by default, the layout of the pagination button is very simple. To improve it and have a result like the one given in Fig. 1 just add the following lines in style.css, which you access by clicking on appearance ⇒ theme editor.
.page_with_pagination{width:100%; float:left; margin-top:20px;}
.page-links-title{border:1px solid #ddd; color:#656565; padding:4px;background:#f7f7f7;font-size:12pt;}
.page-links .no{padding:4px 10px; border:1px solid #ddd; color:#656565; background:#f7f7f7;}
.page-links a .no{background: transparent; color:#656565;}
Moreover, by default the pagination text is in English. In case you want to change it to a different language, e.g., to Spanish, you must access your post template. Keep in mind that the structure of each WordPress template is different. For example, the path could be: appearance ⇒ theme editor ⇒ layouts ⇒ posts ⇒ mypost-template.php. Within this file we check for the function wp_link_pages and we replace where it says Pages by Páginas.
wp_link_pages( array(
  'before' => '' .
  esc_html__( 'Páginas:', 'nepy' ) . '',
  'after' => '',
  'link_before' => '',
  'link_after' => '',
) );
2. Stylized buttons
This code replaces the plugin Maxbutton. As an example, I consider the design used in the first version of nepy.pe, see top button. To style the button, in style.css we write:
.maxbutton-wordpress {
  position:relative;
  text-decoration:none;
  display:inline-block;
  vertical-align:middle;
  width:200px;height:50px;
  border:2px solid #003366;
  border-radius:4px 4px 4px 4px;
  background-color:rgba(0, 51, 102, 0.9);
  -webkit-box-shadow:0px 0px 2px 0px #333333;
  -moz-box-shadow:0px 0px 2px 0px #333333;
  box-shadow:0px 0px 2px 0px #333333;
  font-size:12pt;
  color:white;
}
.maxbutton-wordpress:hover{
  border-color:#003366;
  background-color:#93a7af;
  -webkit-box-shadow:0px 0px 2px 0px #333333;
  -moz-box-shadow:0px 0px 2px 0px #333333;
  box-shadow:0px 0px 2px 0px #333333;
  color:#003366;
}
Then, to create the button, we write the following in a post:
<p style="text-align: center;">
 <a href="http://www.website.com/link" target="_blank" rel="noopener">
  <button class="maxbutton-wordpress">Button name</button>
 </a>
</p>
3. Stylized responsive tables
Download the plugin WP Responsive Table to make use of responsive tables. This plugin works automatically, that is, you just need to create your tables to see the results. To stylize the tables we take as an example the one used in the first version of nepy.pe (see upper table). For this, in style.css we write:
table {margin: 0 0 15px;width: 100%;border-collapse: collapse;}th {font-weight: 600;border: 1px solid #CCC;padding: 5px 10px;background-color: #003366;color: #f8f8f8;}td {border: 1px solid #CCC;padding: 5px 10px;}
Then, to create the table, we write the following in a post:
<table style="width: 50%; border-collapse: collapse;">
 <caption>Table: Title</caption>
 <thead>
  <tr>
   <th style="text-align: left;">Row 1</th>
   <th style="text-align: left;">Row 2</th>
  </tr>
 </thead>
 <tbody>
  <tr>
   <td style="text-align: left;">Example 1</td>
   <td style="text-align: left;">Text 1</td>
  </tr>
  <tr>
   <td style="text-align: left;">Example 2</td>
   <td style="text-align: left;">Text 2</td>
  </tr>
 </tbody>
</table>
4. Stylized and resized Google ads.

By default, Google banner ads come with a yellow background. This is easily fixed by adding the following line in style.css:
ins.adsbygoogle { background: transparent !important; }Another important point is related with the difficulty one has in choosing the correct size of the ad. In many cases a responsive banner is enough to solve this problem, but there are cases where it is not, for example, when we place a banner in the header. In large screens the dimension of the ad is 700 x 290 px (see Fig. 2), while in small screens (mobile screens) it should be smaller. To achieve this, we add the following code in style.css:
.adheader { width: 300px; height: 60px; }@media(min-width: 350px) { .adheader { width: 340px; height: 60px; } }@media(min-width: 400px) { .adheader { width: 390px; height: 70px; } }@media(min-width: 500px) { .adheader { width: 490px; height: 70px; } }@media(min-width: 600px) { .adheader { width: 590px; height: 80px; } }@media(min-width: 768px) { .adheader { width: 728px; height: 90px; } }@media(min-width: 978px) and (max-width:1025px) { .adheader { width: 628px; height: 90px; } }
As you can see, we have created the adheader class and assigned responsive features to it. What remains to be done is to set the class in the ad, which has been created using Google AdSense. An important point to note is that this ad, in Google AdSense, must be created in display format and must be non-responsive (fixed). The fixed dimension depends on the size you want it to be in a large screen, e.g., 700 x 290 px. The ad code, in this example, is placed in the header template, which is located, for the specific case of nepy.pe, in appearance ⇒ theme editor ⇒ layouts ⇒ headers ⇒ myheader-template.php. The code is as follows:
<script async src="https://pagead2.googlesyndication.com/pagead/js/adsbygoogle.js">
</script>
<ins class="adsbygoogle adheader"
  style="display:inline-block"
  data-ad-client="ca-pub-123456789"
  data-ad-slot="987654321"></ins>
<script>
  (adsbygoogle = window.adsbygoogle || []).push({});
</script>
As you can see, on line 3 of the code we have added the adheader class. In this way, our ad acquires responsive characteristics despite initially having been defined as fixed.
A third important point to discuss is the fact that sometimes the dimensions of the ad do not fit the dimensions of the page. This is because Google AdSense has standard dimensions for its ads and if you want another dimension that is not on their list, it will ignore it. To solve this inconvenience we use the styling property: padding, which will allow us to create an additional white space so that the ad adopts the required dimensions. An example appears below:
<div align="center" style="padding-bottom:20px;">
 <script async src="https://pagead2.googlesyndication.com/pagead/js/adsbygoogle.js">
 </script>
 <ins class="adsbygoogle"
   style="display:block"
   data-ad-client="ca-pub-123456789"
   data-ad-slot="987654321"></ins>
 <script>
   (adsbygoogle = window.adsbygoogle || []).push({});
 </script>
</div>
As you can see, the ad code now appears inside a div that has the style: padding-bottom:20px. This allows us to create a 20 pixel blank space at the bottom of the ad. In this way, the ad is shifted upwards.
5. Stylized images and slides

Let's focus first on the slides. In Fig. 3 we show a static image of the slide. If you want to see it working, refer to the article: "The most efficient method to learn English: Cultural exchange." If you like the slide and want to have it on your website, you must first download the plugin MetaSlider, then you should choose the Nivo Light template of the plugin and consider a transition with a delay of 6000 ms and an animation speed of 400 ms. Next, you need to add the following to style.css:
.metaslider .caption,.metaslider .cs-title,.metaslider .nivo-caption {background: #f8f8f8;color: #3d3d3d;opacity:0.8;position: static;}.metaslider.ms-theme-nivo-light .nivoSlider img {display: none;left: 0;position: absolute;top: 0;border: 0.5px solid #f8f8f8;}
Regarding the fixed images. To achieve the same style as the Nivo Light Metaslider template, we add the following to style.css:
.wp-caption {border:0.5px solid #f8f8f8;margin-bottom: 20px;max-width: 100%;}.wp-caption img[class*="wp-image-"] {display: block;margin: 0% auto 0;max-width: 100%;}.wp-caption-text {text-align: justify;color:#3d3d3d;font-weight:500;}.wp-caption .wp-caption-text {margin: 0px 0px;background: #f8f8f8;opacity: 0.8;padding:10px;}
6. Stylized text in code format
To stylize the code tag, as they appear in this article, one must first download the plugin Highlighting Code Block. Then if one wishes to display, for example, the following code:
<html>
 <head></head>
 <body></body>
</html>
In the text editor of a post you should write the following:
<div class="hcb_wrap">
 <pre class="prism undefined-numbers lang-html" data-lang="HTML">
  <code><html></code><br />
  <code> <head></head></code><br />
  <code> <body></body></code><br />
  <code></html></code>
 </pre>
</div>
7. Stylized footer.

To have a footer similar to the one given in Fig. 4, we have to divide it into three columns and use as background color #333333, and as text color #d8d8d8. Since the style depends a lot on the WordPress template you use, we are going to focus only on two important points: i) setting up the social icons and ii) setting up the tag cloud buttons. For the first one we use an HTML widget to write the following:
<p>
<a href="https://www.facebook.com/statsconchris" target="_blank" rel="noopener" style="text-decoration: none;"><img src="https://i.ibb.co/DCq6nFh/facebook-gray.png" width="20" height="20" alt="" style="border: 0; line-height: 100%; outline: 0; -ms-interpolation-mode: bicubic; color: #ffffff;" /></a>
<span> </span>
<a href="https://twitter.com/statsconchris" target="_blank" rel="noopener" style="text-decoration: none;"><img src="https://i.ibb.co/SBTC3jh/twitter-gray.png" width="21" height="18" alt="" style="border: 0; line-height: 100%; outline: 0; -ms-interpolation-mode: bicubic; color: #ffffff;" /></a>
<span> </span>
<a href="https://www.github.com/statsconchris" target="_blank" rel="noopener" style="text-decoration: none;"><img src="https://i.ibb.co/dkMpT6c/github-gray.png" width="21" height="20" alt="" style="border: 0; line-height: 100%; outline: 0; -ms-interpolation-mode: bicubic; color: #ffffff;" /></a>
<span> </span>
<a href="https://www.youtube.com/statsconchris" target="_blank" rel="noopener" style="text-decoration: none;"><img src="https://i.ibb.co/n6ZFTY9/youtube-gray.png" width="21" height="20" alt="" style="border: 0; line-height: 100%; outline: 0; -ms-interpolation-mode: bicubic; color: #ffffff;" /></a>
<span> </span>
<a href="https://www.instagram.com/statsconchris" target="_blank" rel="noopener" style="text-decoration: none;"><img src="https://i.ibb.co/NVgXgVB/instagram-gray.png" width="21" height="20" alt="" style="border: 0; line-height: 100%; outline: 0; -ms-interpolation-mode: bicubic; color: #ffffff;" /></a>
</p>As you can see from the code, the social icons were previously stored on ImgBB, which is a website that allows you to store images for free. Regarding the button labels, we style them by adding the following codes in style.css
.widget_tag_cloud .tagcloud a {color: #d8d8d8 !important;font-size: 14px !important;border: 1px solid #cfcfcf;padding: 1px 10px;display: inline-block;margin: 0 5px 10px 0;border-radius: 2px;}.widget_tag_cloud .tagcloud a:hover {background: #f54037;color: #fff;border-color: #f54037;}
Note that for the buttons we are defining classes, e.g., tagcloud. You should check in your WordPress template which classes are associated with your tag cloud and use those instead of the ones given here.
8. Justified text on main page.
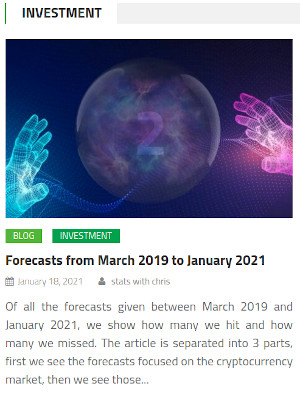
To justify the text of a post, the easiest way is to install the plugin Advanced Editor Tools, which generates the justify button in the editor. However, if what you are looking for is to justify the text of the main page, this plugin won't be helpful. To achieve this, you must write a few lines of code. As an example, let's consider the main page of nepy.pe, specifically the investment section (see Fig. 5). By default, to add text to it, the $post_excerpt_length parameter is used. The complete code is as follows:
<?phpif( $post_count <= $nepy_block_col_count ) {$post_content = get_the_content();echo wp_trim_words( $post_content, $post_excerpt_length, ' ' );}?>
This code does not justify the text. To justify it, we must modify it as follows:
<?phpif( $post_count <= $nepy_block_col_count ) {$post_content = get_the_content();echo '<p style="text-align: justify;">';echo wp_trim_words( $post_content, $post_excerpt_length, ' ' );echo '</p>';}?>
I hope these tips are helpful to you. If you want to check the codes related to improving the performance and the loading speed of a website, click on the following button:
Views: 1
Related Articles


Notifications
Receive the new articles in your email
Other Articles

12 interesting facts about living in Russia
joushe info

How does a capital increase of a public company work
stats con chris

Living in Japan. Breakfast, lunch, and dinner
stats con chris

The quest for the world order: Europe
stats con chris

The origin of bitcoins. A complete explanation for beginners
stats con chris